Learning how to hit a tennis one-handed backhand stroke with correct technique does not have to be a difficult process.
The key is to break down the one-handed backhand technique into smaller and simpler chunks and learn the movements of each chunk. Then you can gradually put them all together for a smooth and effortless tennis backhand stroke.
This article will guide you from start to finish with simple explanations of each phase of the one-handed backhand technique with key checkpoints to keep in mind as you learn the backhand stroke.
Here’s a brief overview of all the steps covered in this tennis one-handed backhand tutorial:
- The Grip – we’ll look at a simple way of finding the one-handed backhand grip and how the pros spread their fingers on the handle differently than most club level tennis players.
- The Unit Turn – there are three checkpoints of the unit turn that help you execute it quickly so that you’re not late when hitting the ball.
- The Backswing – you’ll learn how to start storing the energy with the help of the non-dominant arm so that you have plenty of power when you start uncoiling.
- The Uncoiling – as you start to uncoil your body, your racket needs to go through two key checkpoints in order to produce effortless power and topspin.
- The Contact – you’ll learn how to pass through the contact zone to maintain the ball’s direction and apply enough topspin for good depth control.
- The Follow-Through – having a stable and repeatable follow-through helps you maintain consistency of your one-handed backhand.
Step 1: The Grip
There are many ways to find the right one-handed backhand grip, such as looking at the bevels and the V between your thumb and index finger, but we’ll take a look at a very simple way of finding the grip with no knowledge of bevel numbers required.
Place the racket with your non-dominant hand next to your hip so that the racket face is perpendicular to the ground. It’s like having a sword attached to your belt.
Now place the dominant hand comfortably on top of the handle – and that’s your one-handed backhand grip.

This is the most natural way of finding the one-handed backhand grip.
You can of course move your hand a milometer forward or backward on the handle to find the right grip for your personal feel for the backhand.
Note that if you place the hand comfortably on the handle, the hand naturally does not lie perpendicular to the handle but slightly diagonal.

While all the pros hold the racket like this you can play good backhands also with a more perpendicular grip.
That’s correct way of holding the racket. If you look at the fingers below the handle, you’ll see that the thumb rests between the index and middle fingers.
Almost all pros hold the racket like that on the one-handed backhand, but it’s also acceptable if your hand is a bit more perpendicular to the handle, in which case your thumb will rest just next to the index finger.
I’ve also shared an article on how to find the one-handed backhand grip based on feel and how it’s different from a grip from table tennis, for example.
Step 2: The Unit Turn
Before we go into the specific checkpoints of the unit turn, I’d like to mention the ready position and the split step.
You should be moving lightly on your feet as the ball of your previous shot is on the way toward your partner, and you should time the split step correctly.
The unit turn then begins as you land in your split step and realize in which direction the ball goes.
Assuming it goes to your backhand side, you would start turning the upper body and changing your grip to the backhand while turning (assuming you’re holding a forehand or neutral grip in ready position as most players do.)
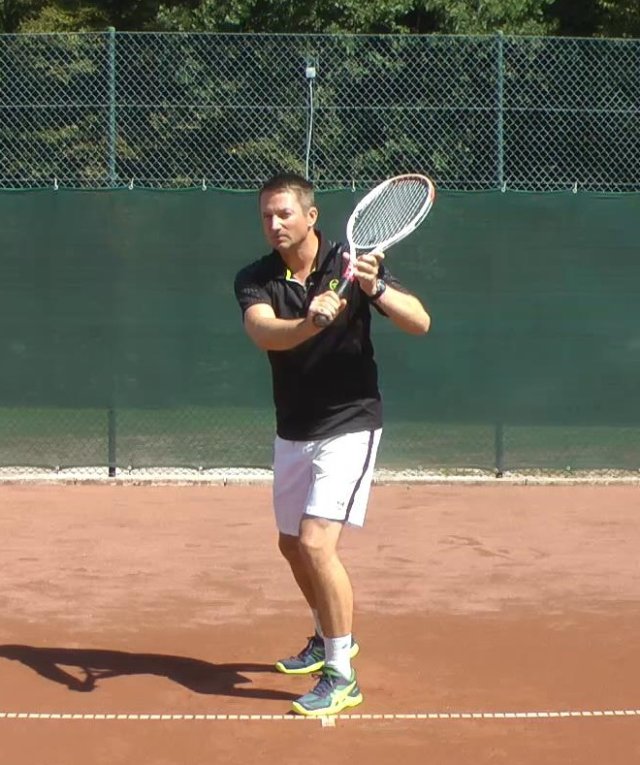
This image shows you checkpoints #1 and #2 of the unit turn. Note that this is before stepping forward.
We can look at three checkpoints of the unit turn:
- as you turn (without stepping forward yet), your hand should not go above your shoulder height but just below it,
- from the side view, the turn should be around 90 degrees or a bit more, and
- you should turn your body as much as you can while still being able to keep facing the ball and looking at the ball equally with both eyes (otherwise, your 3D depth perception will be poor and result in poor timing of the stroke).

Note how much Wawrinka can turn his shoulders and yet maintain both eyes forward. This requires extreme flexibility in the neck area… Image credit: https://www.youtube.com/watch?v=GgNASyLyGAg
Another important point when turning to the side is that your non-dominant arm must pull the racket into the turn and that your dominant arm is actually slightly resisting in order to create a stretch in your shoulder and back muscles.
Do not turn leading with your dominant side but always feel some pull of the non-dominant arm/side.
Step 3: The Backswing
The one-handed backswing should be a smooth continuation of the unit turn. Contrary to how it looks and is called (backswing), we don’t really swing backward.
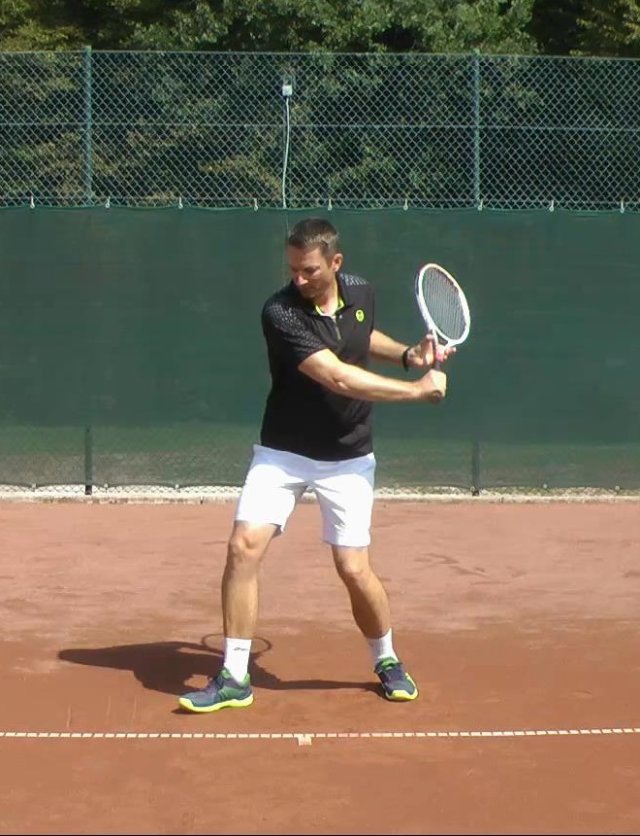
The initial unit turn becomes a bigger turn of the body as we step forward which gives an illusion of a backswing.
The illusion of a big backswing happens because:
- we allow the momentum of the unit turn to take the racket a bit further back;
- we step forward in most cases when preparing for the one-handed backhand, and that causes the racket to move further back in space when viewed from the front – but in relation to the body, the arm did not move backward at all; and
- we start uncoiling forward, which makes the arm and the racket lag.
One checkpoint to keep in mind is the foot orientation when stepping forward into a neutral stance.
A common mistake is to align the foot with the baseline because the player feels that they turned a lot that way.
They did, but they didn’t achieve any coiling in the hips region because the leg and the hips were in comfortable alignment with no coiling.
Therefore the player does not feel from which sensation to uncoil when they have to.

Note the foot orientation as we step forward into a neutral stance.
The general rule is to point the foot/toes toward the ball at the contact point.
That creates some tension or coiling between the leg and the hips, and the player can use that tension to uncoil as they begin the forward swing.
The foot will only position sideways in more difficult situations when the player is more stretched as they are trying to reach the ball, in which case they have no choice of how to align the foot.
Step 4: The Uncoiling
The unit turn and the backswing are simply ways of storing energy for the one-handed backhand, and the uncoiling is then the start of releasing that energy toward the ball.
At advanced level (above 4.0 NTRP) the uncoiling makes the racket lag behind the body which may seem as a bigger backswing. But it’s not a “BACK-swing” since the body is already rotating forward. Make sure you understand what I mean!
The uncoiling must start from the legs extending, then the hips starting the uncoil and the upper body following.
The most common mistake is not to engage the front leg enough, meaning not bending it enough in the first place and then not really driving upward, which prevents the player from really uncoiling the hips/pelvis region.
That way the player only plays from the upper body uncoiling and arm movement, which will make the one-handed backhand stroke feel very weak.

This "Double 45" position is easy to visualize and easy to remember.
The key checkpoint in the uncoiling phase is the “Double 45” position of the racket.
Double 45 refers to the degrees in space in two planes.
As we start the uncoiling from the hips and upper body, the arm and the racket lag.
If you execute the movement correctly, the racket will pass through a position where it’s turned around 45 degrees of the line perpendicular to the baseline and is also aligned at 45 degrees downward.
These are simple guidelines that are easy to remember, but in reality these angles are not so exact as they depend on the situation the player is in.

In this case during play my racket did reach around 45 degrees in horizontal plane but maybe just around 20 degrees in vertical plane.
When the player has a lot of time and the ball is not very low, they will likely have the first angle over 60 degrees (sometimes close to 90 degrees) and the second angle maybe just at 20 degrees.
In other cases when they receive a fast low ball and they shorten the swing a bit to control it, they will have the first angle only at around 30 degrees and the second angle at 45 degrees.
As we are teaching the fundamentals of the tennis one-handed backhand technique, we need to look at the most common racket orientation in space when receiving a typical nice rally ball at comfortable height. In those cases, the player can visualize the Double 45 position as a guideline.
This position creates a stretch in the forearm muscles which then release this stored energy as we’re hitting the ball, which contributes a part of the power we release into the ball.
At this point, I can mention a common mistake on the one-handed backhand, which is using the wrist too much.
While it may visually seem that it’s the wrist that drops the racket under the ball and then lifts the racket head up after the contact, that’s not the case.
It’s the shoulder tilt and the arm/forearm rotation that causes that movement.
When we’re hitting a basic rally backhand from the baseline, there is no wrist movement at all. The wrist is actually very stable and calm during the contact phase in order to control the racket head alignment in space.
Step 5: The Contact
As we’re contacting the ball, we can look at three key checkpoints:
a) Keeping a stable wrist, not trying to flick it to impart topspin
As mentioned above, players want to flick their wrist as they are contacting the ball in order to impart topspin.
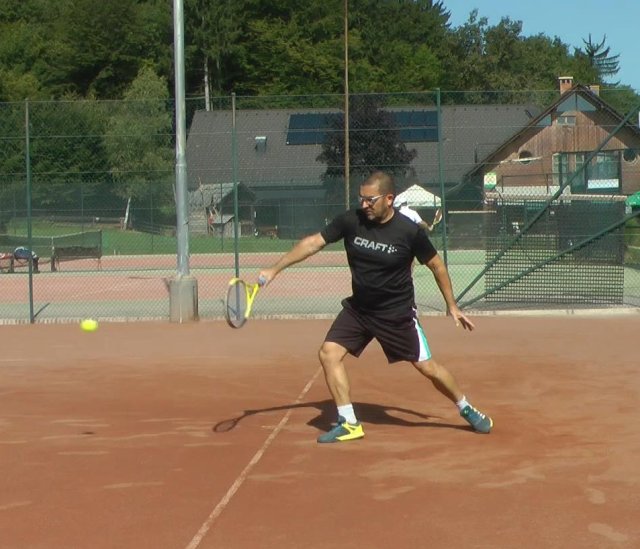
In this image a few frames after the contact you can see that the wrist has not moved at all, it's stable.
We don’t really impart topspin this way on the backhand as the wrist loses stability if we release it. As a result, we don’t hit the ball clean, nor can we control direction well.
Note: We cannot spin the ball as much on the one-handed backhand as we can on the forehand!
The way I suggest you visualize imparting spin is just letting the upward swing path of your arm create some topspin on the ball.
That way, you will apply enough topspin on your one-handed backhand to control the ball well.
b) The contact point is well in front of the front foot
One-handed backhand stroke can be hit comfortably with effortless power only way in front of your body.
While you quickly learn how bad it feels when you hit the ball too late and you quickly adjust to a better contact point more in front, usually players still don’t hit in an optimal contact point that’s even more in front than they think.

The contact point for the one-handed backhand is usually more in front that you think.
So work on preparing early and looking to meet the ball way in front of you until you find that ideal contact point / zone where the ball effortlessly flies off your racket. Always try to engage good weight transfer when in neutral stance.
c) Stopping the body rotation, which we do by engaging the non-dominant arm in the opposite direction of the swing
Since we started the uncoiling process, the body has been rotating forward and is gaining momentum along the way.
The most natural way for the body is to continue its rotation, but if we allow the body to keep rotating, then our racket will move across the ball and we’ll find it very difficult to control direction and impart topspin.
That’s why we need to stop the body from rotating for a split second to allow the racket to move more in a straight line toward the target.

Note how the non-dominant arm creates a counter-movement.
We can stop the body by moving the non-dominant arm in the opposite direction of the swing.
This move doesn’t have to be very long and extended, but it needs to be dynamic and energetic.
We also stop the hip rotation by firming up the muscles around the pelvis region.
When we stop the body from rotating, a transfer of momentum happens and the arm accelerates quite effortlessly.
Step 6: The Follow-Through
The key to correct one-handed backhand follow-through is to extend the arm fully and not allow the body to rotate, as explained above.
What tends to confuse players about the follow-through is when they observe a tennis pro like Stan Wawrinka finish the backhand follow-through facing forward with the body.
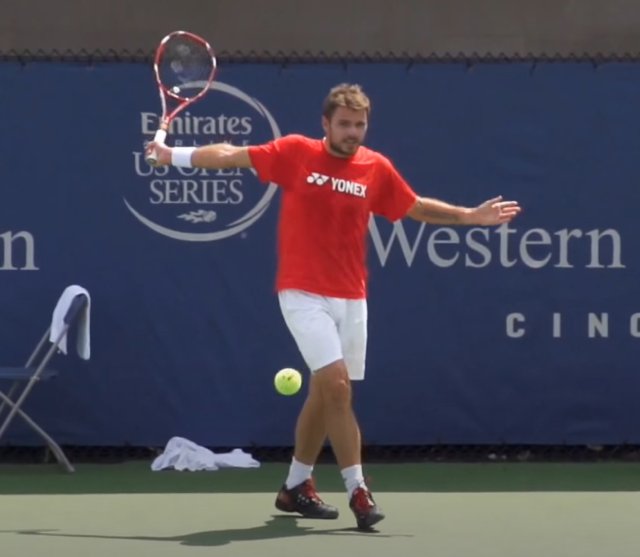
Stan Wawrinka facing forward with his body is what causes the most confusion about the one-handed backhand follow-through… Image credit: https://www.youtube.com/watch?v=Cb5xK9Xjny8
You may believe that that’s the way to finish the one-handed backhand stroke.
But if you were to carefully observe the execution of the backhand in slow motion, you would see that there is a short period of time when Wawrinka stops the body/shoulders from rotating to control direction of the ball better.
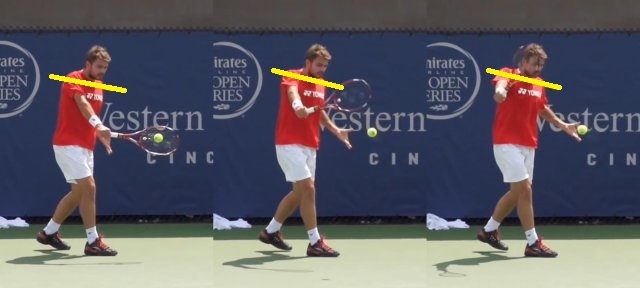
There is basically no shoulder / body rotation going on as the racket is passing through contact zone!
It’s just that as soon as he feels the stroke has completed, he allows the body to rotate again because of comfort and because he needs to recover and get ready for the next stroke.
This delay of body rotation is in reality just a couple of tenths of a second and is therefore often overlooked.
When we are in the learning phase of the one-handed backhand technique, we want the student to hold the finish and not rotate to recover yet in order to feel the finish and ingrain that sensation of not allowing the body to rotate.

Visualize the one-handed backhand follow-through like this...
We can look at three checkpoints when it comes to the follow-through:
- the hitting arm is fully extended,
- the racket is vertical, and
- the dominant and the non-dominant arms are aligned in a straight line.
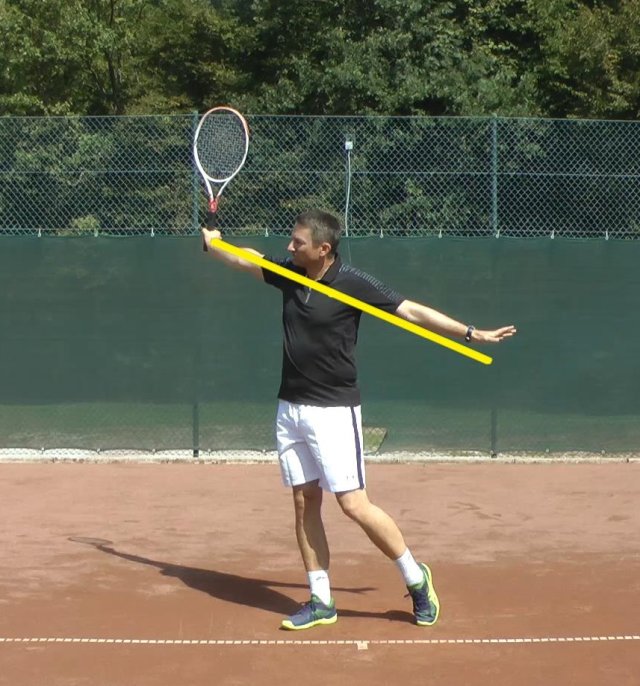
Here's a view of the backhand finish from the side view with all three checkpoints more obvious.
The one-handed backhand follow-through feels a lot firmer than the forehand follow-through, and that’s because the arm is fully extended on the backhand but usually bent on the forehand.
So make sure you are aware of the different feels as you compare the forehand and the one-handed backhand follow-through.
Summary
The main goal of this video article is to give you concrete checkpoints of the one-handed backhand technique so that you are not confused as you search for information on how to hit the one-handed backhand correctly.
Note that these checkpoints are not set in stone but simply guidelines, as tennis is an open skill sport, which means we need to constantly adjust the technique of our strokes in some way depending on the situation we’re in.
While this video article is quite extensive, it’s actually just a small part of the complete One-Handed Backhand video course, which includes more than 3.5 hours of video instruction.
The one-handed backhand Technique module expands on all topics covered above with additional modules on:
- Biomechanics with drills to develop effortless power and correct movements of the whole body,
- Footwork with explanations and drills to master all major types of footwork, and
- Tips & Corrections to overcome the most common problems on the one-handed backhand.
Stay tuned for more articles on the topic of one-handed backhand as I will share simple progressions for tennis beginners and various tips and corrections that will help you master the most elegant tennis stroke.


Excellent tutorial as usual, Tomas! I particularly appreciated your comments on the firm wrist, which turns only as a result of a forearm rotation. Also your suggestion for players who are not advanced to avoid focusing on generating topspin–many coaches are, I think, unrealistic about the challenge of mastering that technique. I’ve been working on generating topspin by forearm rotation through the shot, which requires very good timing, it seems to me–but I think that is the method that you use, in addition to the upward swing path. I’ve always enjoyed your focus on the “feel” of a shot–and the feel which has helped me is the focus on a relatively firm swinging arm, somewhat like a pendulum rotating from the shoulder, driven by legs, hips, and torso. As is always the challenge, I find it plenty difficult to be in the precise position to hit a good backhand: the right distance from the ball, and to time it consistently. Especially difficult to take high balls, or those that require sort of a half-volley swing. Thanks for all you do!!!!
Thanks for the feedback, George!
Just two quick tips:
– while the wrist is stable it we must not hold it stiff and block all movements. It simply means we don’t actively engage it to generate topspin. To me personally if feels more like holding it in place.
– to use the upward swing path for topspin many players forget to DOWNSWING first and then they find the upswing very hard and slow. If you let the arm with the racket swing down (gravity) then the upswing happens by itself.
Excellent Tomaz video, very complete, thank you very much and best regards.
These thorough instructions are so helpful to me. Thank you, Tomaz, for your insight.
And thank you for dropping by and commenting, Shari!