Hitting a tennis forehand stroke with incorrect non-dominant arm positioning and movement will lead to very inconsistent forehands even though it seems at first glance that the non-hitting arm is not important.
As you will discover, the movements of the non-dominant arm on a forehand are actually caused by upper body stability that is necessary for stability of the racket head through contact and therefore consistent forehand strokes.
The first part of this video article explains how the upper body affects the movements of the non-dominant arm.
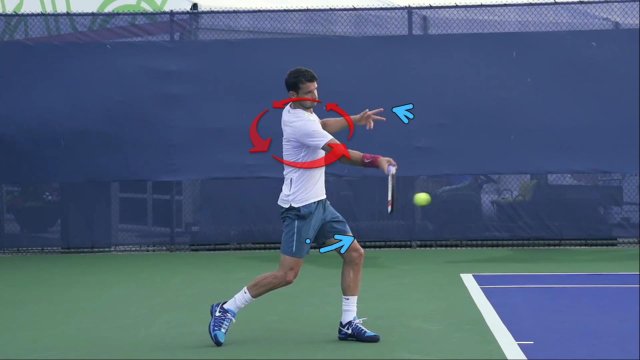
We’ll analyze Grigor Dimitrov’s forehand in slow motion to show how the non-dominant arm is used during the stroke and how we control the ball through body rotation.
In the second part (scroll below), you’ll learn 6 exercises that will help you use the upper body and the non-hitting arm correctly in a tennis forehand stroke to hit it much more consistently.
(All pro footage and images credit: essentialtennis.com)
Correct Vs Incorrect Use Of The Non-Dominant Arm
What does a forehand look like when the non-dominant arm is not used correctly?
Usually players actually engage the non-hitting arm in the forehand preparation phase, but they collapse it during the stroke so it just dangles down next to the body.
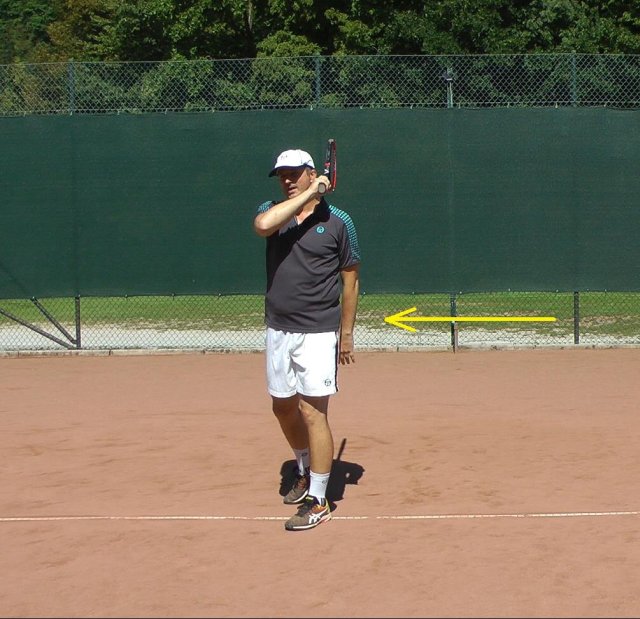
The most common way of non-dominant arm collapsing at the end of the forehand.
Some players just bend the arm and push it into the body as the forehand stroke is being executed.
Other players simply keep the non-dominant arm dangling down next to the body from the start to the finish of the forehand.
The right non-dominant arm movement is to either move it parallel to the hitting arm throughout the stroke or to tuck it in a bit in the follow-through.
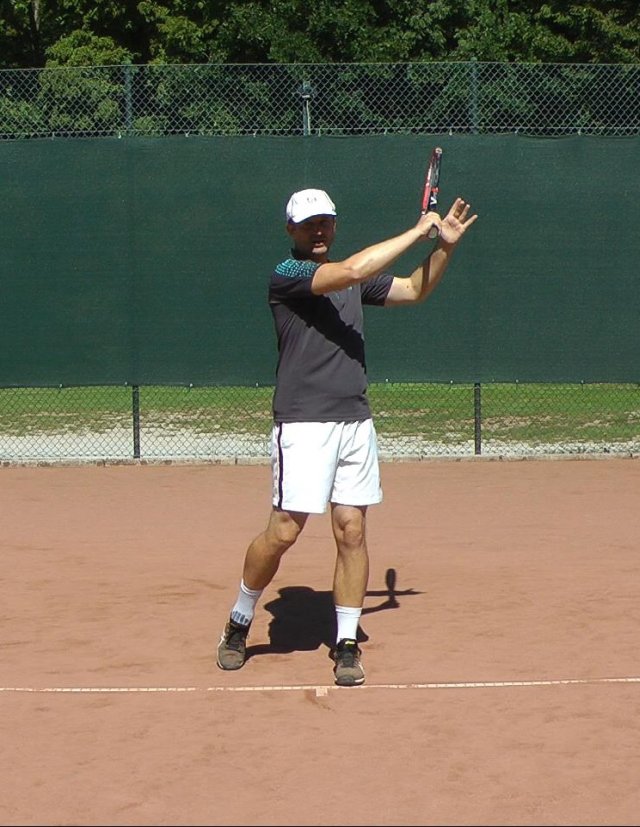
The arms should move in sync on the forehand either like this or …
The player may tuck the arm in because the racket head speed is very high in higher tempo play, and one could hurt the arm if they were catching the racket in the follow-through.

... the arm is tucked in a bit like this.
The tuck-in move, by the way, is subconscious.
Many pros “catch” the racket in the follow-through with their non-dominant hand when they warm up (since they play slower then) but usually tuck the arm in when the play a match.
Upper Body Stability And How It Affects The Non-Dominant Arm
If you pay attention only to the non-dominant arm on the forehand and try to literally move it like you see the pros do it, you’ll miss the big picture.
The non-dominant arm movements are NOT caused by the arm itself but by upper body firmness, which we also call upper body stability.
I can define this firmness in three areas:
- upper chest muscles (especially non-dominant side!),
- non-dominant shoulder muscles, and
- muscles around both shoulder blades (scapula).
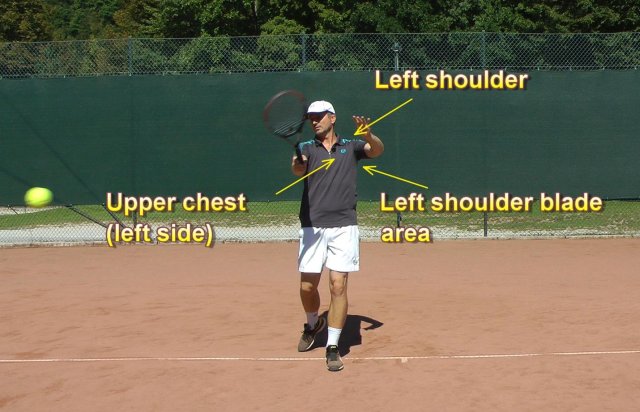
The non-dominant side STABILIZES the movements of the dominant side!
These three areas are all firm / stable throughout the execution of the forehand stroke!
Most recreational tennis players relax or let go of the firmness/stability of these muscles as they are swinging forward with the dominant arm since they don’t feel how this stability would help them hit faster and more consistent forehands.
There is also so much tennis instruction about hitting arm movement that the player’s attention is entirely on the hitting arm.
Naturally the brain simply “instructs” the rest of the body to let go since there is no attention to it.
What’s wrong with the player failing to stabilize the upper body and engaging only the hitting arm when executing a tennis forehand stroke?
When the player engages many muscles of the hitting arm, the three arm joints (shoulder, elbow and wrist) will allow that movement, and that will change the racket angle as it’s hitting the ball.

The movement in elbow and wrist joints causes racket angle to change.
Because we have many small muscles in the arm and because we hit the forehand in many different situations, there are infinite possibilities for how the arm and its flexible joints will align the racket at contact.
The racket angle keeps changing at contact, so the balls fly out in many different trajectories, making the forehand stroke inconsistent.
We call that an unstable racket at contact.
The forehand stroke is also weak because the arm has no support from the body behind it.
While it’s possible to accelerate the arm quite quickly using arm muscles only (without body rotation) and hit the forehand quite fast, this process will fatigue the arm and result in a loss of power after only a short time of playing.
And what is the biomechanically correct way of hitting a forehand that gives us effortless power and high consistency?
We need to stabilize the upper body and rotate it as one unit to which the hitting arm is attached.
This again refers to the shoulder rotation article, but this time we’re explaining it from the view of the non-dominant arm.
When the upper body is stable and rotates as one unit, it will transfer the force of rotation through the arm into the ball.
That simply means we will feel a lot of power coming into the ball. When we feel we have enough power, we will stop engaging the arm so much!
The arm muscles will be “quieter” just stabilizing the arm, which we can observe as no significant movement of the elbow and wrist joints.
While the shoulder joint has to allow smooth movement of the arm for a fluid swing, we don’t really want much movement in the elbow and wrist as they change the racket angle the most.
You can observe that process in Grigor Dimitrov’s forehand as there is no elbow or wrist joint movement during the hitting phase of the forehand.
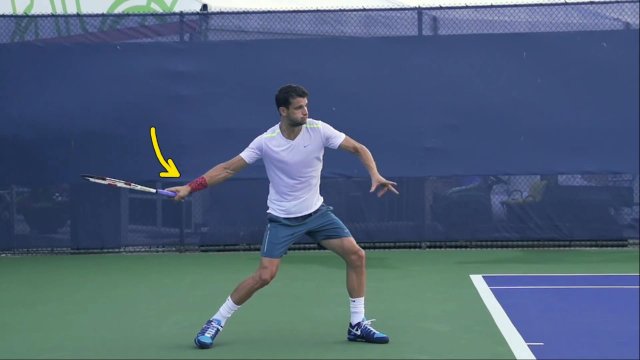
Dimitrov starts the forehand stroke with a relaxed wrist...
When Grigor starts the forward body rotation towards the ball, his relaxed wrist will stay in the extended/bent position.
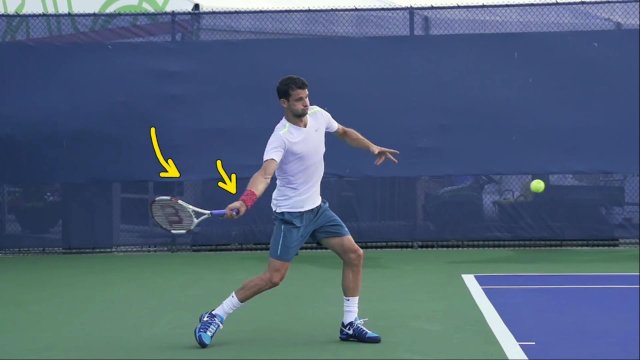
... and the wrist will lag as the forward body rotation begins.
After that, the wrist and the elbow joint will not show any movement in slow motion analysis.
They are stabilized and calm, and that means that the racket face is also calm and set to hit the ball.
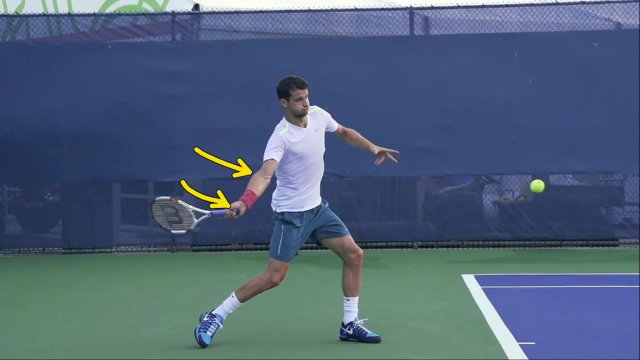
Wrist and elbow joints at the start of the forehand swing...
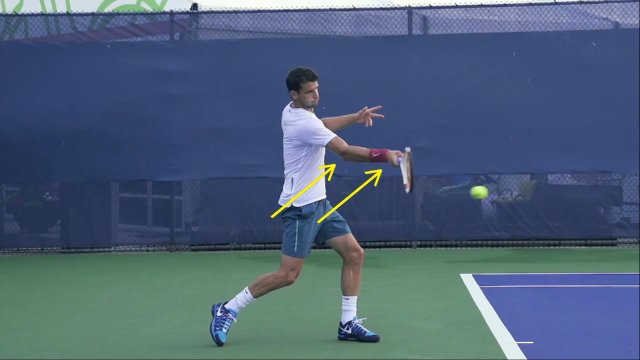
... and just after contact. There has been no movement in these two joints.
The racket face angle does not change just before and after contact.
This stability/calmness of the racket face gives the player consistency of the forehand because he can bring the racket face at more or less the same angle into contact over and over again as the muscles in the arm are not engaging much (except stabilizing).
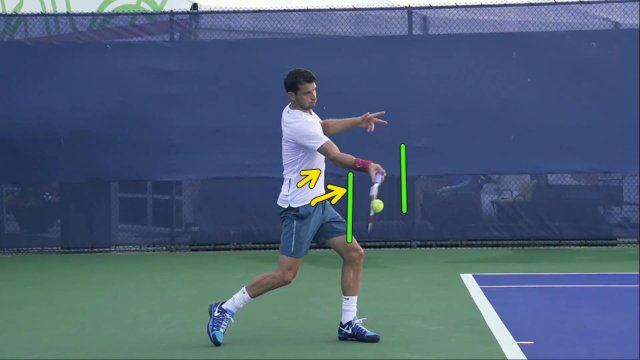
Because of wrist and elbow stability there is no change in racket angle through contact. (green lines)
As a result, we don’t see movements in the elbow and wrist joints.
And how does Grigor achieve such stability of the racket face?
He engages body rotation instead of his arm muscles.
We can observe how well he rotates the upper body by observing the synchronization of the movements of the left and right arms.
As you saw in the video above, if I play the video frame by frame, you can see that the right arm moves forward as much as the left arm moves backward.

The upper body rotation causes the arms to be so perfectly in sync.
That means there is rotation of the upper body that is the cause of both arms’ movement – and it’s not the arms themselves that cause the movement.
If the player wants to rotate the upper body well, he needs to feel it as a single unit.
He can feel it as one unit if he contracts certain muscles in the upper chest, the non-dominant shoulder and around the shoulder blades.
When the player is that firm or stable in the upper body, you will see the non-dominant arm “sticking” out and moving in sync with the hitting arm.
Here’s the full video of Grigor Dimitrov’s forehand in slow motion where you can observe what you just learned.
Forehand = Arm Swing + Body Rotation
The biomechanical foundation of a tennis forehand stroke is the body rotation where the upper body stays firm/stabilized throughout the stroke.
This provides the base off which we swing the arm.
So, to get to the final forehand technique, we just need to relax the arm initially as it begins the forward movement in order to benefit from gravity and effortless acceleration that we get when we swing the arm.

The forehand starts with a relaxed arm swing...
The arm then stabilizes before and during contact, and the player focuses on upper body rotation as the racket is moving through the hitting zone.

... and continues with body rotation and non-dominant side stabilization.
That enables the player to keep the racket face calm/stabilized as the contact is happening, which results in very consistent forehands.
Summary
This article was just a theoretical explanation of the role of the non-dominant arm on the forehand stroke, which by now you realize is not really what it’s all about.
The movements of the non-hitting arm are caused by the upper body firmness (while it’s rotating), which is what enables us to hit with effortless power and a high level of consistency.
While you may now intellectually understand how to hit a correct tennis forehand stroke, your body doesn’t speak English and it will still not perform the correct movements.
You now need to teach your body how to engage differently than before, and we can do that only through actual exercises.
Part 2 – Six Exercises For Improving The Function Of The Non-Dominant Arm On The Forehand
Now that you’re theoretically clear on the role of the non-dominant arm of a tennis forehand stroke and how its position and movements are caused by upper body stability and rotation, let’s take a look at six exercises that will help you improve your forehand.
Drill #1 – Number-Eight Horizontal Swings
I’ve shown this exercise before, in the Universal Swing video article, and I would like to again give credit to my fellow coach Mili, who taught me this exercise.
Keep your arms extended and constantly parallel to each other, and swing them in a horizontal number-eight shape.

I learned this drill from Mili I use it all the time. Mili's website - tennismethod.com
Start in an open stance and eventually introduce the neutral stance foot position. Then alternate between them while still continuously swinging your arms.
This exercise is one of the most effective ones for correcting the non-dominant arm and upper body movements, and I use it with almost every tennis player who struggles with their forehand.
Drill #2 – Squeeze The Racket And Simulate A Forehand
Hold the racket at its ends with both hands – so that one hand is holding the tip of the racket and the other the butt of the racket – and simulate a forehand.
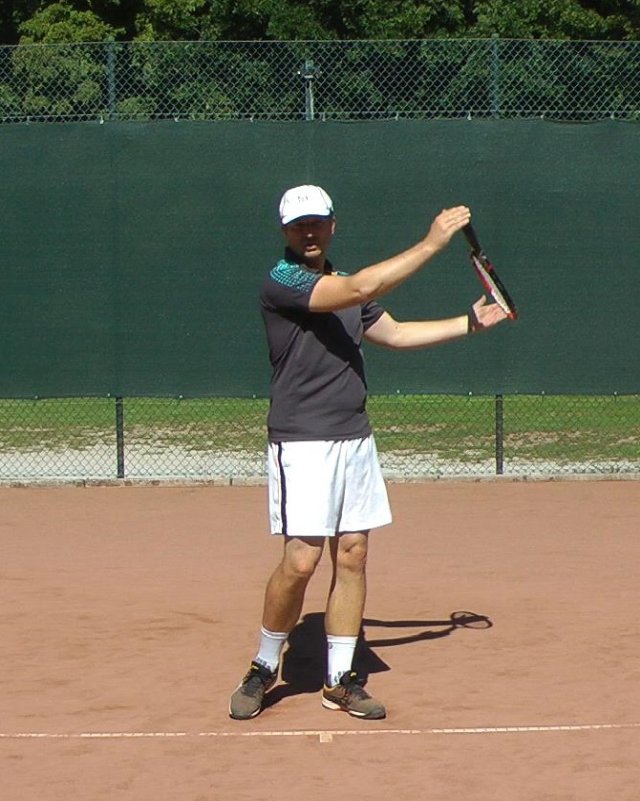
Make sure you squeeze your hands/arms together with a bit of force so that your upper body firms up.
You can just simulate one forehand at a time or swing in the number-eight shape, as described in drill #1.
Drill #3 – Forehand Half–Half
Your goal is to simulate the forehand in the same continuous number-eight shape but hold the racket half of the time with your hitting hand and the other half of the time with your non-hitting arm.
Start with your non-hitting arm holding the racket in the ready position while the hitting hand is very near the handle.
Prepare to the side while still keeping the hands’position the same, and at that position, switch hands. Now, keep the non-hitting hand close to the throat of the racket, where it was holding it before.

Simulate a forehand swing until the finish around your non-hitting shoulder, and then switch hands again.
Try to perform this smoothly back and forth while switching hands as described above.
This drill also teaches you to always prepare the stroke with the non-hitting side initiating the unit turn, which results in a much smoother and effortless forward body rotation.
Drill #4 – Push The Hands Into Each Other And Rotate
I learned this drill from my friend Neil, who is an expert on biomechanics.
Interlock the fingers and push your hands into each other in front of you so that your elbows are pointing outward.
As you push your hands and arms into each other, you are firming up the upper body muscles.
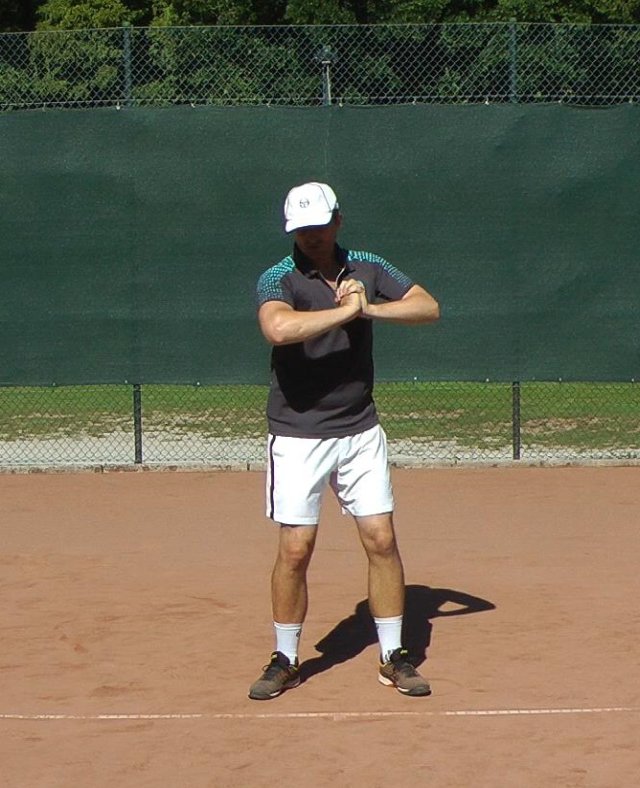
Maintain that firmness, and slowly rotate your body left and right continuously.
Pay attention to which muscles are engaged while you’re performing this exercise, and later try to engage them when you’re hitting an actual forehand.
Drill #5 – Forehand With Extra Weight In The Non-Hitting Hand
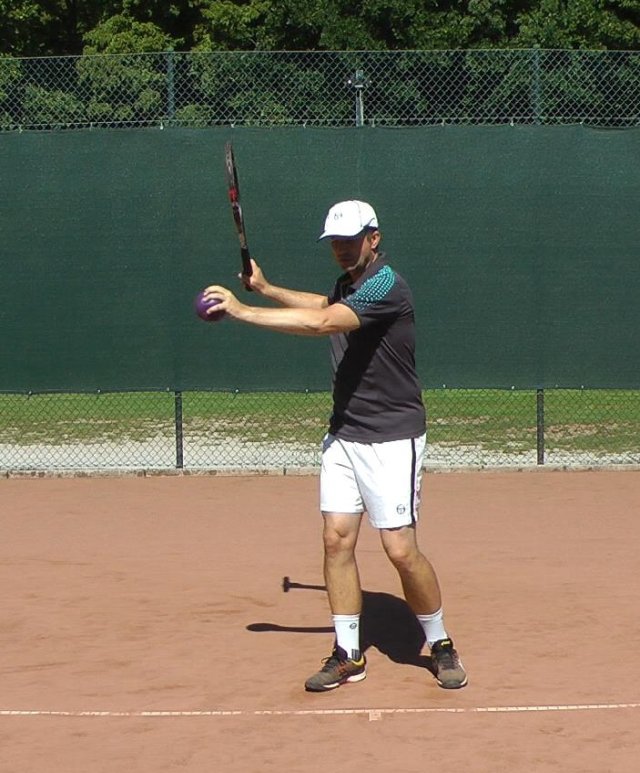
Hold around 0.5 kg of weight in your non-hitting hand while simulating the forehand continuously in the number-eight shape.
I use a light medicine ball that weighs 0.5 kg (1 pound), but you could also hold a small bottle of water or anything else that weighs around the same.
Holding that extra weight in the non-dominant arm will automatically force you to engage more muscles on the non-dominant side and therefore program your body to engage them the same way when you actually hit a forehand.
The key to changing old habits to new habits is, of course, lots of repetition over a period of time.
A very effective variation of this drill is to execute the forehand in slow motion because you will really feel the engagement of the non-dominant side.
I also recommend you do all of the exercises explained here in front of the mirror if you can because it will give you a clear mental image of how the forehand should look.
Drill #6 – Forehand With WearBands
One of the best devices you can use to learn to correctly engage the upper body and the non-dominant arm is the WearBands device.
This is a belt that you wear around your waist, from which you can attach elastic bands that you also attach to your hands and even legs.
In our case, we use just one elastic band, which we connect from the belt to the non-dominant hand.
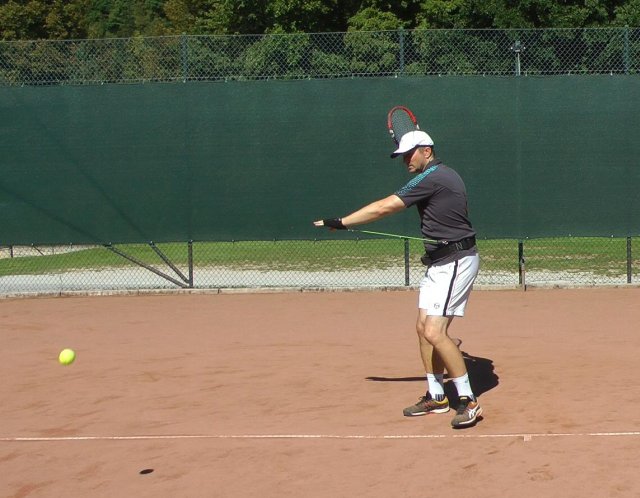
Your goal is to simulate the forehand from start to finish while keeping the elastic band attached to your non-dominant arm, all the time stretched.
In most cases, tennis players do stretch the band when they start the forehand preparation but slacken it as they swing forward with their hitting arm.
So it’s very important to pay attention to the tension of the elastic band as you swing forward and also in the follow-through.
If the elastic band is stretched, then you are forced to engage the upper body and the non-dominant arm, which is what we are looking for.
Also practice holding the follow-through for a few seconds and feeling the engagement of the upper body and the non-dominant side so that later on, you can focus on those muscles when you hit the ball without the WearBands belt.

Practice holding the follow-through for a few seconds to feel the firmness of upper body.
The WearBands belt actually allows you to hit some balls while wearing it, which is great.
Many players perform the forehand correctly when there is no ball while doing one of the exercises shown here, but as soon as we introduce the ball and they need to hit it, they revert back to old habits.
So the WearBands device “forces” the player to correctly engage the upper body and the non-dominant arm, even when they are actually hitting the ball.
In conclusion, all of these six exercises target the same muscles and movements, just in slightly different ways.
It’s important to have different exercises for the same goal in order to keep the training interesting, as the player has to perform many repetitions over an extended period of time, and this can become boring.
I suggest you perform one or two exercises for about three to five minutes each session, three or more times per week, and you will likely see a change in your upper body stability and non-dominant arm movements in about two to three weeks.



Such a clear and beautiful description/explanation – big, big thanks.
Welcome! Making sure this is clear as there are a lot of misconceptions about the non-dominant arm.
Thank you for the detail analysis. A similar analysis for single backhand would be appreciated.
So good, will keep working on this when I practice then play this afternoon! Looking forward to the drills. Thanks.
Excellent.Great importance to us recreational players
Thank you Tomaz.
Very good! Theory well explained, thanks!
I love your videos. they are so technically correct to every small single details. Very often, i have to learn and unlearned the old habits according to your instructions. Great
Hi Tomaz…thank you for this tutorial and the other recent ones on hipand shoulder rotation.
Very helpful to me to watch these and then revisit your “effortless forehand” course.
Your comment on the playing arm “tuck in” as an option instead of “catching” the racket is excellent.
I thought I was catching the racket a lot of the time, but a review of my videos tells me I am not! Too often it just dangles like a length of spaghetti! Being more aware of the tuck in option will help me from Noe on.
here in the UK all tennis court she are closed. I am practising shots in the garden, and indoors with mirror, (both without a ball) to change or improve my “muscle/stroke” memory.
Tomaz, I think you have said you did this too when you started out in tennis?
Best wishes and thanks again.
Thanks for the feedback, Mike!
I started tennis at around 13 years old, playing with my friends, occasionally with my father who played a bit.
Did not have a single tennis lesson in my life, learned mostly visually, with shadow swings in front of the mirror and unimaginable amount of free hitting in the summers, playing between 3-6 hours per day, every day.
Played 90% free hitting and about 10% playing for points for the first 5 years of my tennis life.
Later played more points but always had more free hitting than points play, the ratio was around 4:1.
I don’t play competitive recreational tennis since around 2005 or so. Just enjoy hitting…
I do not entirely agree with your view.
If the non-dominant arm is turned more prominently with the backswing as the racquet is taken back, it will produce more fluidity in the overall swing aiding the front shoulder in the forward pivot.
Hi Tomas! I decided to write although I have been reading your mailing lists for a long time. I’m very embarrassed that I decided to write you just now. The thing is that I’m already 60 years old and have been interested in tennis since I was 35. But have to play occasionally. The reason – knee problems and surgery. So my level remains recreational. However, reading your posts I learned a lot of new things and became better versed in the nuances of the great game. Thank you very much! Wish you to stay healthy and active, enjoy the project you have made, well-being and prosperity!
Thank you very much for the kind feedback, Vyacheslav!
I am glad that the posts helped so stay tuned, many more on the way!
The best tennis article I’ve read in a long time, incredibly thorough and clear, both very practical and at the same time every advice and drill is put into context with a relevant biomechanical explanation, I love it! Thanks a lot, Tomaz.