There is a way to practice tennis at home with various workouts and actually improve your game without hitting any balls.
While you can’t improve your timing or your ability to adjust to different situations by practicing at home, you can improve a lot when it comes to fundamental tennis techniques of groundstrokes.
That’s because you are in a controlled situation without any rush and you can focus on different body parts, which helps you develop greater awareness of them as well as correct major technical flaws of your forehand and backhand.
The following article covers 3 major at-home tennis workouts that cover the forehand and the one-handed and two-handed backhand strokes.
Each workout contains various drills that teach you how to target key body segments involved in the whole stroke.
The drills in each workout are structured very similarly, namely we want to engage the key body parts from the ground up.
After the initial loosening up exercises and some core activation exercises, you’ll first work on balance and weight transfer, then legs, core, upper body, arms and wrists.
Once you go through all the exercises, you can try to put everything together in a smooth manner.
In the second part of each video, you’ll learn some of the most common mistakes in executing the exercises and receive a few more explanations about the technical/biomechanical details of the strokes.
Forehand At-Home Tennis Workout
So let’s first get started with the forehand at-home tennis workout, and then I’ll mention a few things to keep in mind as you do the exercises.
Perform all exercises for 20-30 seconds. You can do even longer (1-2 minutes) if you don’t really feel the purpose oft the drill well.
1. Reset exercise – relax your arms and whole upper body and shake yourself while turning slowly left and right.
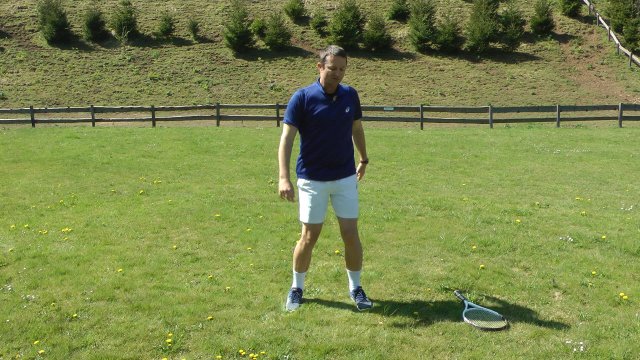
2. Core activation – choose one of the 10 core activation exercises shown below (or even find many more online) and engage your core for 20-30 seconds.

3. Pelvis/hips activation – position yourself in a semi-open stance, hold the racket with both hands at the tip and at the handle and try to keep the racket mostly still while you twist your pelvis back and forth. Then position yourself in an open stance and engage the outside leg with the pelvis twist.

4. Feel the ground and weight transfer:
– neutral stance: hold the racket in the same way as in #3, but this time swing it in the shape of a smaller horizontal figure 8. At the same time, transfer weight from your back to your front foot.
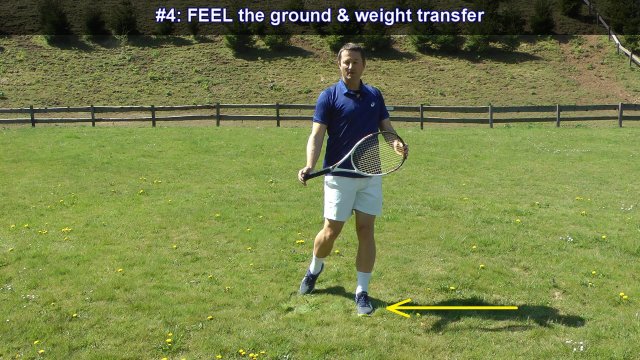
– open stance version 1: transfer weight from leg to leg as you keep swinging the racket like before.

– open stance version 2: keep your weight on the right leg and bend and extend it while twisting your hip. After 10-20 repetitions, transition to transferring weight with a delay. Observe how I do it in the video above.
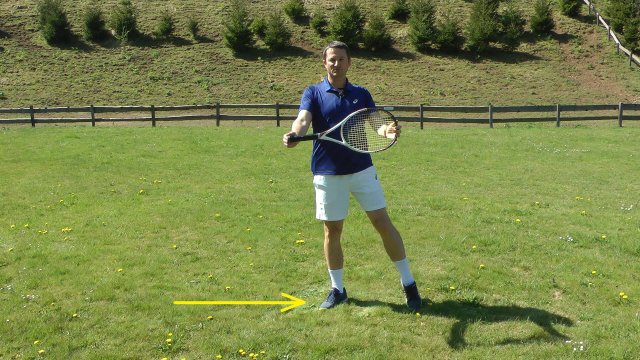
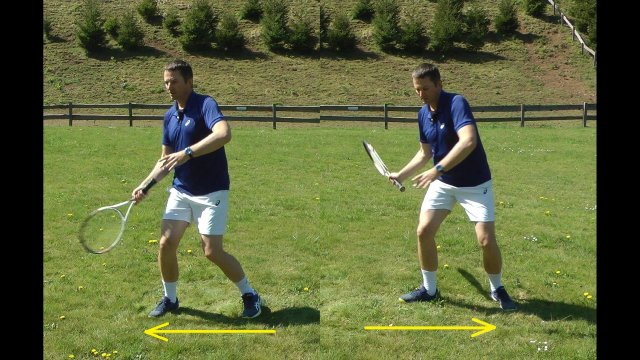
– Feel the ground with NEUTRAL stance foot shifts: you can choke up on the racket handle and hold it with one hand. In a neutral stance, keep shifting your front foot to different positions (left and right) while you transfer weight and simulate a shortened forehand stroke.
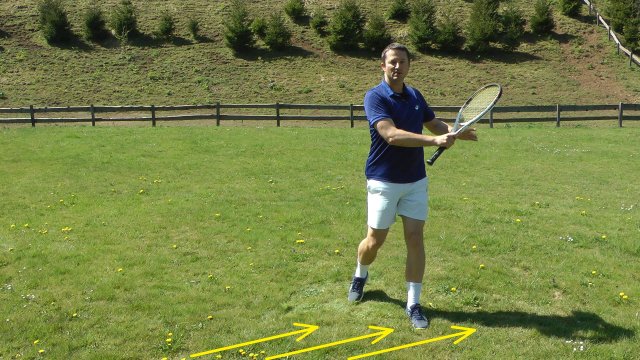
– Feel the ground with OPEN stance foot shifts: we are practicing the variation of the weight transfer in the open stance which depends on the direction of movement. When I move to the right with two steps (as a right-hander), I balance on my right leg as I am executing the stroke. But, when I move to the left with two steps, I will be transferring weight to my left leg while I am executing the stroke.
. Feel the legs (stairs exercise) – perform neutral and open stance forehands on the stairs as shown in the video below. Pay attention to good stability before, during and after the stroke.
6. Feel the chest and shoulder stability – hold the racket at the tips with both arms parallel and apply some pressure. You should feel your upper chest area become more firm. You want to maintain that feeling of firmness (stability) while you perform simple swings back and forth, stopping the racket at shoulder height. Practice in neutral and open stance.

7. Core activation – perform core activation exercises again for 30 seconds in order to prepare the body to lead and the arms to follow in the next exercise.
8. Feel the arm swings – start without the racket and swing your arms in a horizontal figure 8 shape while keeping them parallel. Practice in neutral and open stance. This drill has been shown in more detail in the Universal Swing video article.

9. Feel the wrist lag – hold the racket very gently with the index finger through the throat. Perform figure 8 swings by the side of your body. The goal is to always lead with the butt of the racket and allow it to flip at the extremes of the swing (at the back and in the front).

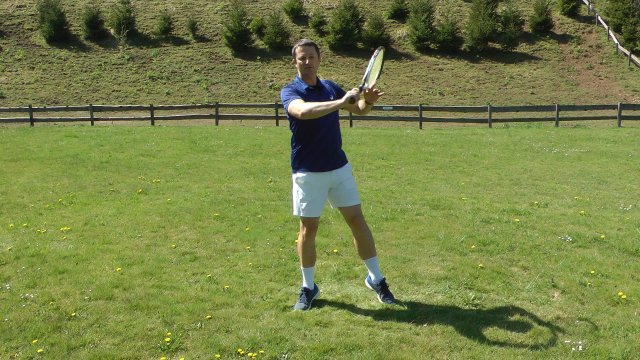
10. Put everything together – try to connect and coordinate all the movements together in a smooth manner. You can now hold the racket by the handle as usual and also perform the forehand technique as you usually do with your own style.
Fixing The Most Common Mistakes Performing The Exercises
The exercises work only if you perform them correctly. While they look very simple and easy to copy, there are some nuances that you need to pay attention to.
a) Proper posture when transferring weight
You may want to lean backwards as you transfer weight on the back leg as that’s how you interpret or imagine the weight on the back leg.

Transferring weight to the back foot does not lean leaning back.
But if you lean back, you will lose balance and power. It will also take a split second longer to transfer weight forward as you’re fighting your own weight.
Instead, you need to always maintain a forward-leaning posture even when you transfer weight backwards. This principle applies to all three strokes demonstrated in this article: the forehand, the one-handed backhand and the two-handed backhand.
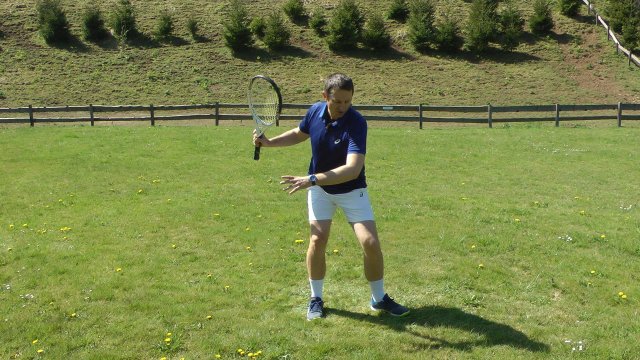
Weight mostly on the back foot and yet forward leaning posture.
We don’t transfer weight to the back foot by leaning backwards but by rotating the upper body and coiling the hips.
You will still feel most of the weight on the back foot, yet you’ll be leaning forward which will make it easy, quick and strong to initiate the stroke forward.
b) Stable foot on the stroke finish
A common mistake is to transfer weight so far forward that the heel of your front foot leaves the ground.

At that moment, you are very unstable as most of your body weight has to be balanced only on the balls of the feet.
The correct way of stabilizing yourself is to keep the whole foot on the ground with the weight equally distributed over the whole foot.

You can find more detailed explanations of the importance of balance and how to work on balance in previous articles.
c) Coiling the hips
This problem happens mostly in the open stance forehand where the player bends their knees but doesn’t really coil the hips/pelvis backwards.
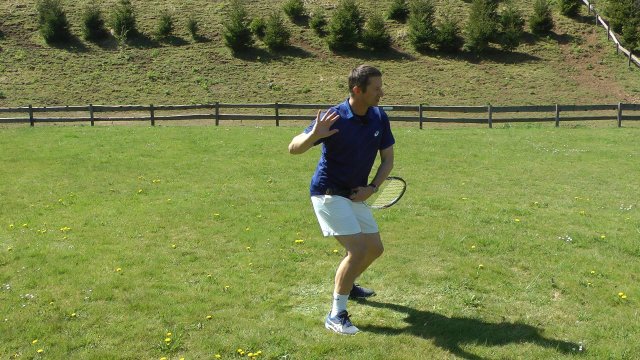
Only when you coil the hips well can you connect the lower and upper body well.
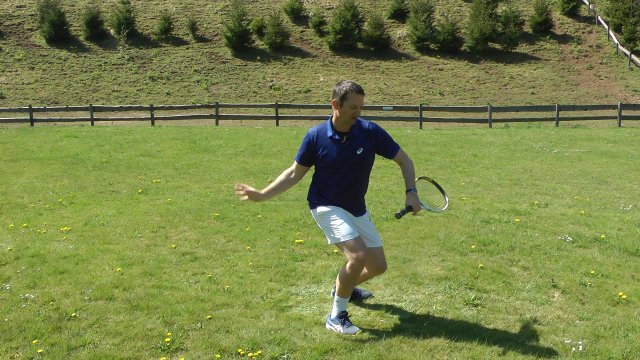
That means that when you drive upwards with your legs, the force will transfer well through the pelvis to the upper body.
d) Releasing the heel in open stance forehands
Sometimes when players are not used to the open stance forehand, they will keep their heels on the ground as they transfer weight from leg to leg.

This is a problem because, in doing so, they block the pelvis rotation and cannot execute the stroke well.
The heels need to leave the ground as the foot pivots a bit because this lets the pelvis and the rest of the body freely rotate.

e) Swinging the arms freely
Sometimes players are unable to relax and swing their arms since they have so much tension in them.
If you have this problem, try the jacket trick first. Wear a sports jacket but don’t put your arms in the sleeves, just keep them pressed against your body.
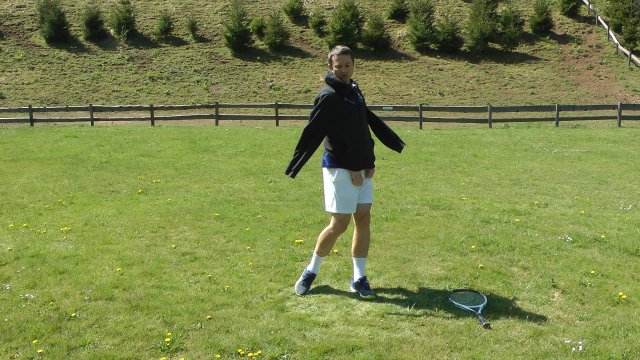
The sleeves are now freely dangling down, and if you start turning your body left and right, the sleeves will flail around and follow the body movements.
That can give you a clear mental image of what should be happening with your arms and also help you really focus on body movements since your arms are not engaged.
After a while, take the jacket off and try to repeat the figure 8 arm swings and see if you can relax your arms better.
f) Being able to engage and twist the pelvis
Not engaging the pelvis is probably the most common mistake at the recreational level when hitting forehands. It’s part of the “hitting the ball late” problem.
When you contact the ball late, you have to twist your body in a certain way to still make the ball go over the net.
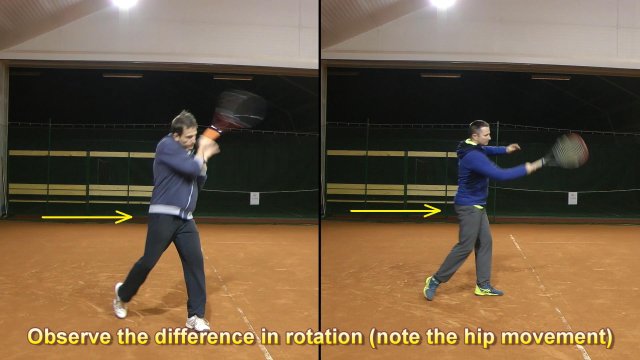
An example of how the pelvis is not engaged in the forehand stroke.
Of course, players may play tennis like that for years with a stroke that is powerless and uncomfortable and therefore inaccurate.
I correct pelvis rotation with 95% of the recreational tennis players I work with. That’s why it’s so important that you perform the exercises shown in these at-home tennis forehand workouts in order to retrain your body to move in new ways.
Correcting pelvis rotation is usually done through some isolation exercises or exaggeration exercises so that the player really feels the pelvis and is well aware of it.
A simple exercise to start with is a crossover warm-up drill that is used in many sports as a part of the warm-up routine.
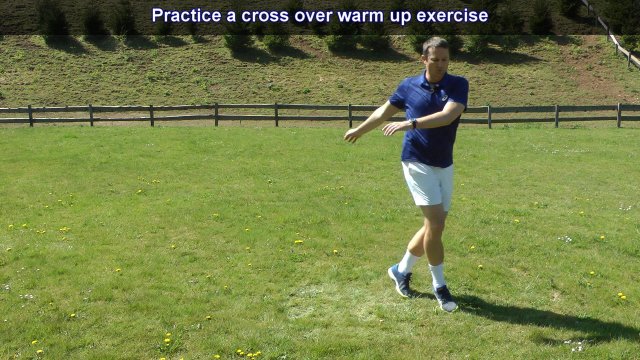
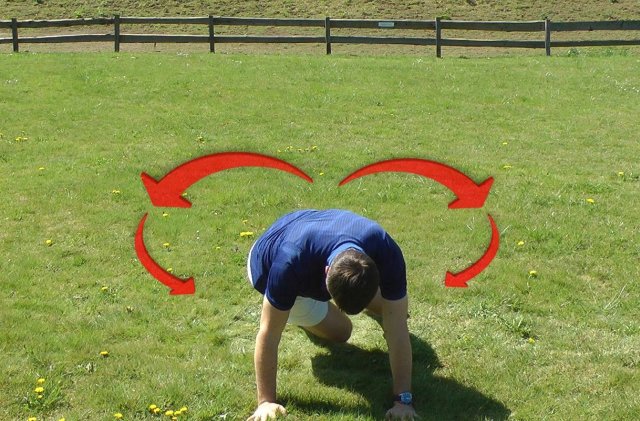
A more advanced exercise is to get into a “bear” position – see the pic below – and twist your pelvis and legs left and right.
For those who want to go deeper into the biomechanics of the forehand and feel that they are very uncomfortable while playing, check out the No-Thought Tennis Biomechanics course.
One-Handed Backhand At-Home Tennis Workout
The one-handed backhand workout follows very similar structure to the forehand, so we’ll just skip the open stance weight transfers and put a bit less focus on the core.
I will also shorten the descriptions when they are the same as for the forehand.
1. Reset exercise
2. Core activation
3. Pelvis/hips activation – same as the forehand, just do it on the backhand side of your body.
4. Feel the ground and weight transfer drills – same as the forehand
– Feel the ground with NEUTRAL stance foot shifts
– Feel the ground with OPEN stance foot shifts – no need to do this as it rarely happens on the one-handed backhand.
5. Feel the legs (stairs exercise)
6. Feel the arms movement – hold the racket as usual for your backhand and perform figure 8 swings by the side of your body without releasing the racket. Make sure your pelvis and the rest of your body are moving in smooth, gentle sways as you swing the body by your side. Also pay attention to the vertical swings of the racket. Observe carefully in the video and images how I do it.

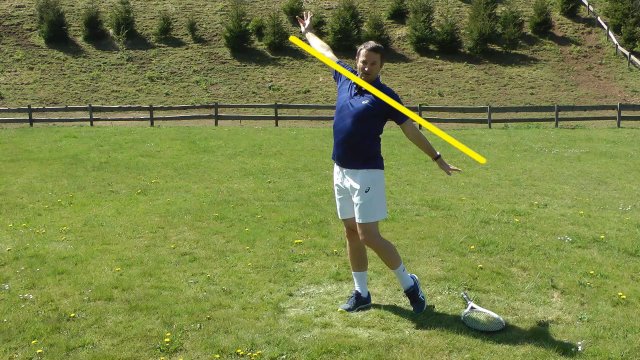
7. Feel the back – this exercise is unique to the one-handed backhand since we engage more of the back muscles when we play a one-handed backhand. Extend the arms as shown in the picture and squeeze together your shoulder blades, firm up your upper back and hold for a few seconds. Repeat 10-20 times.
8. Put everything together – try to connect and coordinate all the movements together in a smooth manner.
Common Mistakes On The One-Handed Backhand
Players tend to repeat the mistakes from the forehand side so let’s take a look at a couple of examples.
a) Proper posture when transferring weight
The same principle of forward-leaning posture applies here. Even though you transfer weight on the back foot, you shouldn’t lean backwards but maintain forward posture with your upper body.
b) Not engaging the pelvis
The pelvis twist is not as obvious and pronounced as it is on the forehand side, but it’s still there.
Players often focus too much on the upper body and miss the leg drive that connects with the pelvis and twists it.
So, I’d like to offer one more reminder to always perform the pelvis activation exercises even for the one-handed backhand.
c) Keeping space between the racket and the body
Players sometimes pull the racket too close to the body as they go through the backswing, and that prevents a nice loop at the side of the body that allows you to easily generate power.
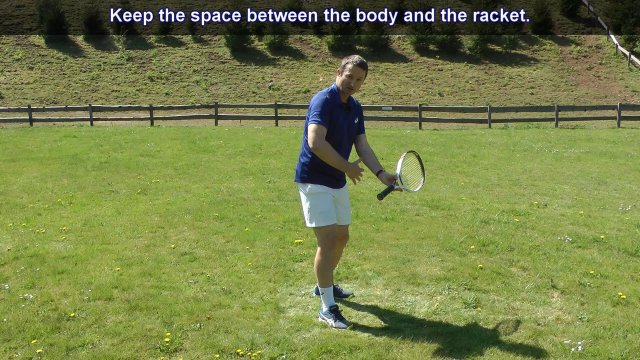
If you follow the exercises as shown in the workout above, you’ll be on the right track to correcting this mistake.
d) Using the wrist to flick or to attempt to apply topspin
Players mistakenly believe that since the wrist is allowing movement of the hand on the forehand side, there’s also an active wrist movement on the backhand.
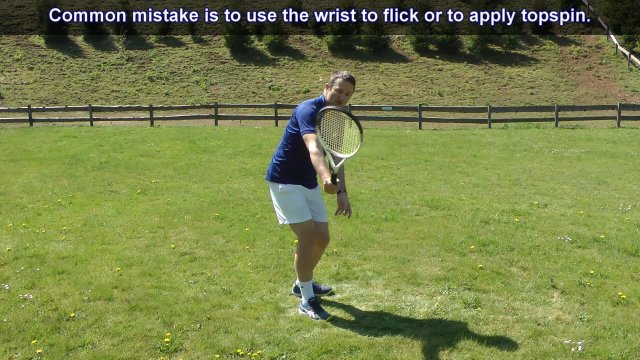
Even more sad is to observe a tennis pro teach it like that.
There is no active wrist movement on the one-handed backhand except in emergency situations.
While the pros may release the wrist a bit more (there’s a difference between releasing and actively engaging it), recreational tennis players should not actively flick the wrist as they play backhands.
The wrist should be nicely firm and stable. While there is some small movement while accelerating towards the ball, this movement is not active.
It’s best to focus on engaging mostly your arm from the shoulder joint. Your legs and pelvis of course engage first, and finally you drive the racket through the ball mostly from the shoulder joint using the whole arm.
One reason why players want to loosen up their wrist is to get under the ball. But tt’s just an optical illusion that the racket got below the level of the ball by relaxing the wrist.
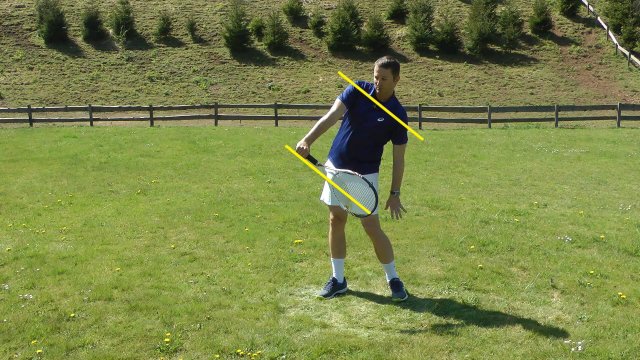
The wrist actually stays firm in the same position, but it’s the whole body that tilts, which positions the shoulders in an upward direction and also positions the racket at an upward angle.
Two-Handed Backhand At-Home Tennis Workout
As you will see, the the two-handed home workout follows almost exactly the same structure as the forehand since the two strokes are biomechanically similar.
It’s as if we wanted to hit a forehand with the non-dominant hand and we just added the dominant hand for extra support.
1. Reset exercise
2. Core activation
3. Pelvis/hips activation – neutral and open stance
4. Feel the ground and weight transfer – same as the forehand, using the neutral stance and the open stance with one or both variations
– Feel the ground with NEUTRAL stance foot shifts
– Feel the ground with OPEN stance foot shifts
5. Feel the legs (stairs exercise)
6. Feel the wrists lag – Perform figure 8 swings by the side of your body and make sure to always create an impulse from your hips. The movement is exaggerated, so observe carefully how I demonstrate in the video. This is not a final technique. It’s just an exercise to help you loosen up the wrists.

7. Feel the arms extension – extend the non-dominant arm fully in the follow-through and don’t bend it. You should end up with the racket in a vertical position.
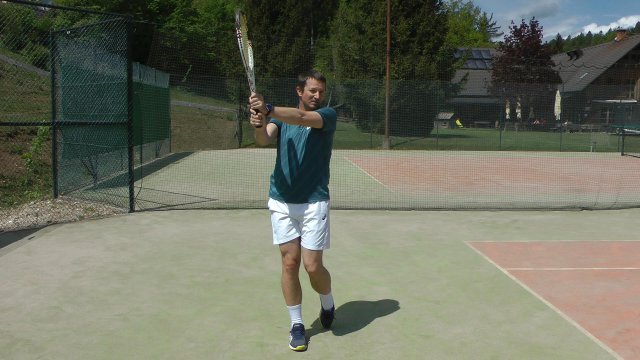
8. Put everything together – try to connect and coordinate all the movements together in a smooth manner.
Common Mistakes On The Two-Handed Backhand
I would point out two of the most common mistakes that specifically apply to the two-handed backhand.
a) Not engaging the pelvis (and hitting the ball on the side / late)
As it’s the case on the forehand, pelvis not engaging / rotating is very common on the two-handed backhand.

One of the most common mistakes on the two-handed backhand
I already explained that in detail in a separate article on correcting the two-handed backhand so I recommend you follow the link.
b) Not allowing the wrists / hands to move
Because players have two hands on the racket they feel they can be really “strong” and they tighten their wrists too much.
But while you may feel strong, your two-handed backhand isn’t because you are eliminating one joint area that can contribute to power.
That’s why it’s very important to do the wrists drill for the two-hander in order for you to loosen up that segment and allow it to be part of the whole stroke.
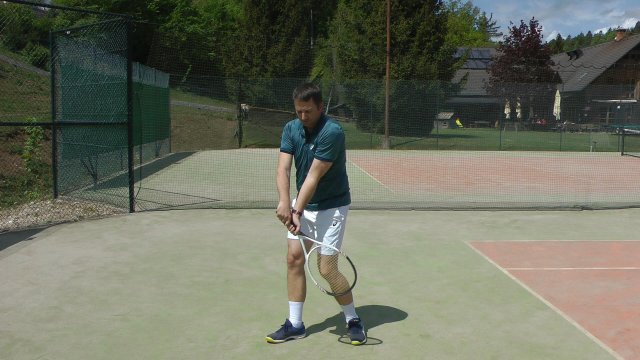
Observe carefully the pros in slow motion and you will see how much movement there is in the wrists on the two-handed backhand.
In summary, I wanted to share with you that I learned tennis groundstroke and volley technique on my own by practicing at home doing shadow swings.
I never had one single tennis lesson in my life, yet I developed such good technique that I passed all coaching certifications on the first try.
I didn’t know all the details I am explaining to you now, but I intuitively practiced in a very similar way and also did a lot of shadow swings in front of the mirror.
So, while these exercises may not look very exciting, they are very effective in helping you coordinate your body better in order to produce controlled and effortless tennis strokes.
They will really prove their effectiveness if you stick with them for an extended period of time, and the best part is that you can practice these workouts at home or even in a hotel room if you’re traveling.



This is awesome Tomaz! Thank you so much for putting this together. I also really like the No Thought Tennis workout … I use the Forehand one.
Great, thanks for the feedback, Karen!
Great job Tomaz! Your easy to understand instructions of a complicated tennis basics are amazing. After many decades of playing tennis I am finally feeling the ground and the ground up kinetic chain of a stroke, loosening the arm & grip for a correct throw of racket! Thank you!
Thanks for spreading the word about the importance of tennis fundamentals, Nick!
Thank you very much! May I ask what is the best grip pressure for ground strokes from 0 to 10? And are the grip pressures for forehand and backhand the same? For me I feel it’s easier to loosen the grip on my forehand and still be in control! Thank you.
hi Tomaz,
As always most insightful but on a personal issue which has me troubled. And if i can gain your great tennis mind on my issue.
If someone hits near as damn it my baseline and basically i’m hitting a half volley, i normally hit the shot fine. But on a half tracker or looper inconsistencies arise.
Just a lack of talent and more practice required or a little mental?
regards, marcus
Hi Marcus,
I would have to see exactly the situation you’re describing. I assume the ball is still rising but not really a half volley, so bouncing a bit further from you.
The question is whether you time it well and just mishit or do you hit late?
Do you attempt to just control the ball and play it back deep or do you want to hit a good shot? The latter one may be too risky…
it was glorious. I have enjoy and learn so much things in the same time. Thank you so much for your effort.